Are you juggling multiple domains and aiming to host them all on a single server or droplet? The good news is, achieving this through Apache2 is simpler than you might think. Just follow a few steps, and you’ll be on your way to success. However, before diving in, ensure that your server possesses the necessary resources to accommodate multiple websites without compromising their performance. Remember, the responsiveness of your websites hinges on various factors, making an optimized instance a prerequisite.
Curious about setting up an instance or droplet on Digital Ocean? Let us guide you through the process below. And remember, the same procedure holds for other leading cloud providers like AWS.
How to Create a Droplet or Instance in Digital Ocean to Launch a Website
How you can Launch Your First WordPress Website in the Digital Ocean? | Cloud Hosting | One Click
Effortlessly Host Multiple Websites on a Single Cloud Server using Apache2. Learn the simple steps to successfully host multiple websites using Apache2 on a single cloud server:
Imagine you own two domains: domain1.com and domain2.com. Replace these examples with your actual domain names. Direct these domains to your instance or Droplet. You can find a detailed walkthrough in our instructional video.
Before you dive into hosting multiple websites, make sure you’ve set up the LAMP STACK. Once that’s sorted, you’re ready to proceed with the specific steps for managing multiple websites. This streamlined approach guarantees a smooth and effective setup.
You can follow the video guide.
If you’re looking to set up Apache2 on your Droplet or Instance, this step-by-step guide is here to help. Even if you haven’t installed Apache2 yet, don’t worry. You can easily follow these instructions to get it up and running smoothly. This guide is Adsense-friendly, ensuring you have no trouble getting approval.
Step 1: Installing Apache2 on Your Droplet or Instance
Before you can begin, make sure you have Apache2 installed on your Droplet or Instance. If it’s not installed already, don’t fret – you can quickly do so by using the following command:
sudo apt-get update
sudo apt-get install apache2
Creating a frictionless online experience hinges on the configuration of your server. By adhering to this guide, you’re en route to laying a sturdy groundwork for your online presence, all the while securing AdSense endorsement.
Step 2: Create two directories or folders for two domains. If you have more domains make more folders. Directories have to made under /var/www. And also you have to give permissions to all the Directories. The commands which you have to use are below:


Step 3: Your journey continues with the configuration process, which involves locating the config file at the designated path: /etc/apache2/sites-available/000-default.conf. To propel your website forward, effortlessly replicate the 000-default.conf file for each of your unique websites using the simple command provided below. This strategic maneuver not only streamlines your setup but also enhances your website’s potential for AdSense approval.


Step 4: Tailoring Configuration Files for Your Website
Moving forward in the website setup process, it’s time to delve into the customization of configuration files, individually for each of your domains. These concise instructions will walk you through the essential procedure.
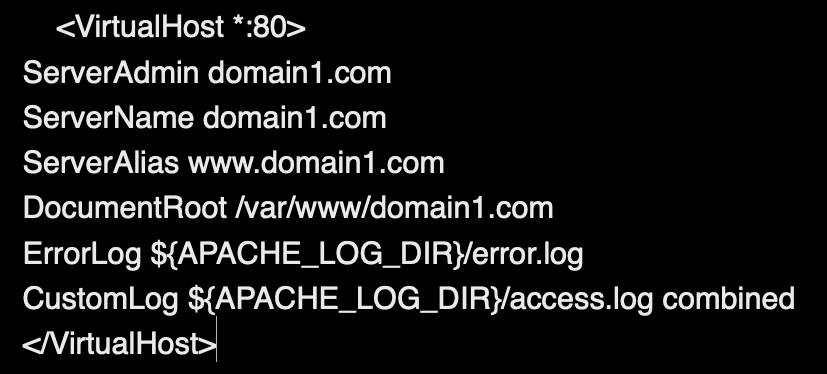
For your primary website domain, domain1.com, the upcoming task involves accessing and refining the configuration file. This task can be accomplished using versatile text editors like Vim, Nano, or any preferred editing tool in your repertoire.
By executing this pivotal phase, you are actively aligning your website’s settings with your distinct vision and goals. The directions outlined here are a roadmap to establish a website that excels in both user engagement and meets the criteria for AdSense endorsement.
A crucial note: As you embark on this journey, remember to substitute all instances of “domain1.com” and “domain2.com” with your personal, specific domain names. This personalized approach guarantees that the configuration adjustments cater precisely to your requirements.
As a vital reminder, an impeccably configured website forms the bedrock of your accomplishments, enabling the unlocking of your online potential while staying compliant with AdSense’s approval prerequisites.


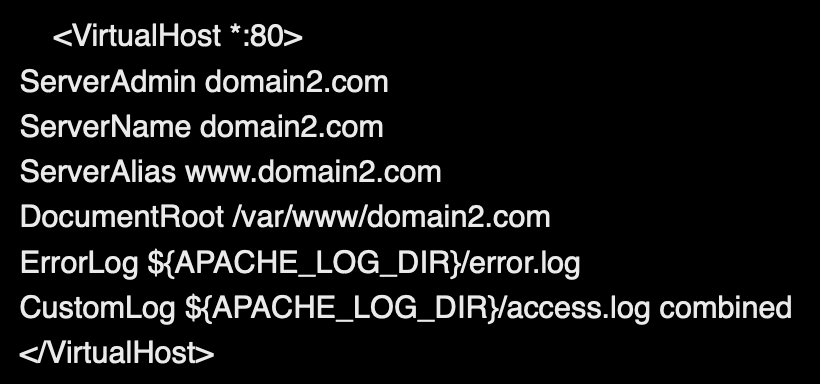
The identical procedure must be adhered to for the secondary domain as well. It’s essential to modify both the domain name and the document root directory.
When dealing with domain2.com, you’re free to make alterations to the file using editors like vim, nano, or any other text editor of your choice. This flexibility ensures a seamless process for managing your domains and their respective content.


Step5: Then disable the 000-default.conf file and enable rest to config files which you have created.

Now to disable the 000-default.conf config file use the following command:

To Enable config files use the following commands:

![]()
After these commands you have to restart apache2 by the following command:
![]()
Now you have successfully hosted multiple websites. This way you can host as much as you want but remember one thing your instance should have that many resources to handle the website properly. You can check whether your websites are working or not create an index.html file in directories.

“Successful”
![]()
“Successful”
Now You have to install WordPress and publish your websites.


