Over the past decade, my computing journey has been inseparably intertwined with Mac OS. The seamless experience and innovative design of the operating system have truly captured my heart. On numerous occasions, I’ve found myself in need of capturing my screen’s essence, whether it’s for crafting tutorial videos or pursuing other creative endeavors.
Within this realm of screen recording, two user-friendly methods have consistently stood out. The simplicity they offer is truly remarkable. Should the desire to immortalize your screen’s content arise, these methods stand ready to assist. The first involves the integration of an external microphone with your system, allowing for the capture of both audio and video. However, should the need arise, you can also rely on your internal microphone to fulfill this purpose seamlessly.
These methods have undeniably transformed the way screen recording is approached, granting users a spectrum of options to suit their needs. Whether it’s the pursuit of flawless tutorials or the preservation of cherished memories, the power to record, edit, and share lies comfortably within your grasp.
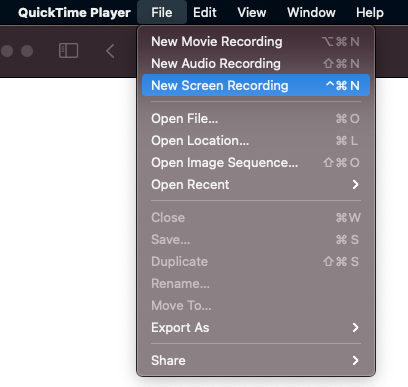
“QuickTime Player” stands as a no-cost application tailored for Mac users. This software gem is seamlessly integrated into the latest Mac OS editions, such as Mojave, Catalina, and Big Sur. Upon launching the application, a treasure trove of features is at your disposal, including the coveted screen recording option, conveniently accessible through the File Menu. Alternatively, a nifty keyboard shortcut, ‘Control + Command + N’, can swiftly initiate this feature. Upon invoking this command, a new window gracefully unfurls at the bottom of your screen.
 Within this window, a panorama of settings awaits your command, offering the freedom to capture the entire screen or meticulously cherry-pick a specific segment for recording. Tinkering with these options is as simple as venturing into the ‘Options’ domain, where the Record Button patiently awaits your touch at the window’s finale. Should your recording endeavors necessitate the orchestration of a timer, the ‘Options’ menu extends a welcoming gesture, revealing a down-arrow that leads to an array of timer choices tailored to your unique requirements. Picking your preferred microphone and designating the destined haven for your recorded files finds its abode in the ‘Options’ Tab once more.
Now, armed with your personalized configurations, a single click on the coveted Record Button sets your screen recording odyssey into motion, gracefully capturing every intricate detail of your chosen screen arena.
Below are some settings available for capturing or recording either the entire screen or a manually selected portion. To modify these settings, navigate to the “Options” menu and locate the Record Button positioned at the window’s end. Should you wish to establish a timed delay before recording, access the down arrow adjacent to “Options” to reveal timer choices. You can then select an appropriate timer based on your specific requirements. Additionally, designate a microphone source and determine the file destination for storing your recorded content by revisiting the Options Tab. Once you have configured these settings, simply activate the Record Button to initiate your desired screen recording.
WordPress Latest Update 5.8: WebP Image Support, Template Editor, PDF Viewer, and Lots More
Discover an alternative approach to capturing your Mac OS screen effortlessly. Employ the convenient keyboard shortcut “Shift + Command + 5” to initiate the process. Remarkably, this shortcut leads to the identical configuration interface found upon launching the QuickTime Player application. It’s worth noting, however, that this method may not be available on older macOS versions. By utilizing this shortcut, you’ll gain access to the same array of settings I previously outlined. These settings can be tailored to your specific requirements before you proceed to commence recording.

Within the interface, various options are available for screen recording or capturing. These options encompass the ability to either encompass the entire screen or manually select specific segments for recording. Modifying these configurations requires navigating to the ‘Options’ section, located adjacent to the recording button situated at the window’s conclusion. Should a timed initiation of recording be desired, one can access the downward arrow adjacent to the ‘Options’ menu. This facilitates the selection of a suitable timer duration tailored to individual preferences.
Additionally, the process involves microphone selection and specification of the preferred file destination for storing the resultant recordings. For these adjustments, revisiting the ‘Options’ tab is necessary. Once all settings are appropriately configured, initiating the intended screen recording is as straightforward as activating the ‘Record’ button. This simple action sets the recording process into motion, ensuring that the desired on-screen activities are accurately captured.
If you’re dealing with multiple displays, you’ll need to designate the specific monitor you intend to capture during your screen recording session. An additional point worth mentioning is that if you desire to store your recorded content in a destination other than the standard Desktop or Documents folders, an extra step is involved. You’ll be required to click on the “Other Location” option, subsequently identifying and selecting the preferred storage path of your choice.
By employing these straightforward methods, you can effectively and effortlessly capture the activity on your Mac OS screen. It’s important to highlight that these techniques do not necessitate the installation of any supplementary software or applications.


